

We’ve all experienced CNC router tearout and splintering while cutting wood at some point.
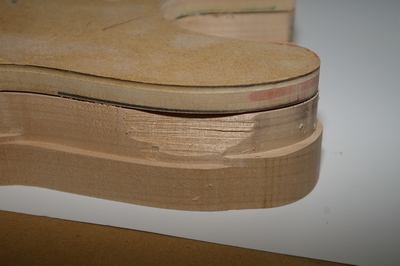
Your CNC Router is sailing along in the cut, the part is just starting to emerge from the stock and it looks awesome. Suddenly, you hear the noise change a bit and a big chunk is splintered or torn out.
It turns out, there are a variety of things you can do to greatly reduce and even prevent router tearout and splintering.
Router Tearout and Splintering Danger Zones
With apologies to Tom Cruise, powering through these Danger Zones is not the right idea. By “Danger Zone”, I mean the conditions where tearout and splintering is most likely. Knowing the Danger Zones will help you to take steps when cutting in these areas to minimize the tearout and splintering.
Danger Zones are anywhere the grain is parallel to the cut. If the cutter is going across the grain, that minimizes the risk of tearout, though it may not eliminate it.
The absolute worst is the transition from end grain to edge grain. Curved cuts can make that more likely, so these are further Danger Zones.
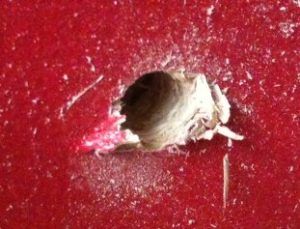
A Quick Word About Holes
As you probably know, holes have their own splintering issues. Depending on your bit type, you may splinter badly when the bit blasts out the bottom of the hole.
Fixing this problem can boil down to:
- Use a different bit, such as a Forstner. This is hard on most CNC machines because the spindle won’t go slow enough.
- Interpolate the hole. This drastically reduces splintering.
- Use a backing board. This provides support so the hole is less likely to blow out.
- Slow way down as you get close to breaking through the bottom of the hole.
Okay, onward to tips that minimize tearout and splintering with more standard milling cuts.
Check out the Tormach 24R CNC Router
Bring On the Tips and Techniques
Tip #1: Use sharp bits. Use carbide, not HSS. HSS dulls too quickly.
If you’re getting fuzz and splintering pretty much everywhere you cut, it’s probably because you need a new bit. Whether that’s to make sure the bit is sharp or to chose a different type of bit (e.g. downcut or compression as seen in Tip #2), it’s a new bit.
You should be sticking to carbide and not HSS. HSS just dulls way too quickly, whereas carbide can stay sharp a lot longer.
Tip #2: Use a downcut or compression bit
While we’re on the topic of changing bits, consider using a downcut or compression bit. These are bits made especially for CNC Routers to use when cutting wood. They’re designed to minimize splintering by changing the direction the cutter pulls against the wood. A downcut pushes down on the wood, while a standard (also called an “upcut”) will pull up. Pulling up encourages the splintering.
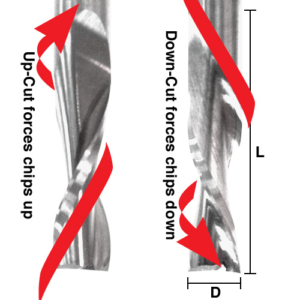
Compression bits try to pull towards the center, so that neither the top nor the bottom of the material splinters.
For more on these special bits, check out our article on CNC Router Bits.
Tip #3: Climb cut the danger zones: Conventional cutting gouges under the grain and rips it up
Climb cutting accomplishes several things that will reduce tear out and splintering. One, it reduces cutting forces, so there is less forcing trying to tear out the wood. Two, chips are cut out as little C-shaped pieces. They are thin at one end and thick at the other.
With Climb Cutting, they start to get thicker as the cut progresses. The cutter eases in.
With Conventional Cutting, they are fat and get thinner. The cutter basically slams in full force, which can make tearout more likely.
I always remember which direction is climb vs conventional by thinking of the cutter as a rubber pinch roller:
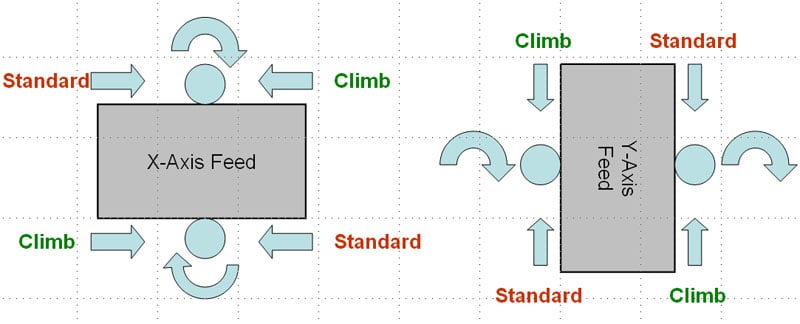
If the pinch roller is pulling the workpiece into the cut, you’re Climb Cutting. If it is pushing against the cut, you’re Conventional Cutting.
If you’ve used a handheld router, you’ll know that Climb Cutting is very uncomfortable. The router wants to take off on its own. But, one of the beauties of CNC is it controls those forces so you can make Climb Cuts whenever you want.
For more on Climb vs Conventional Cutting, we have an entire article about it.
Tip #4: Use a backer board
A backing board can do wonders for reducing tearout because it supports the surface of the wood. Obviously the backer can’t be in the way of the cut. It’s mostly useful when clamped against the endgrain so you can cut parallel to the grain. But, you could also view your spoilboard as a backing board for the bottom of the cut, and you could stack another board to protect the top.
At some point the total stack size is going to become unwieldy, however, so this may not be practical.
Tip #5: Run a proper feedrate, especially if there is fuzzing
Feeds and speeds matter a lot in CNC. Run the proper feedrate for your cutter and material. Our G-Wizard Calculator software is the only Feeds & Speeds software that includes a bunch of features specially designed to help CNC Router users. Start with its database of hundreds of wood species, add support for specialized router cutters like downcut, compression, and straight flute, and go on to vacuum table calculators and more.
Check out the G-Wizard Calculator for CNC routers
Tip #6: Run a separate roughing and finishing pass.
If the splintering is relatively minor, running a separate roughing and finishing pass can get rid of it altogether. The idea is to make the finishing pass much lighter than the roughing pass so it clears the splintered area, but due to the lighter cut does not create any new splinters. Since this may take more than 1 finish pass, this brings us to Tip #7:
Tip #7: Run multiple (3 or 4) lighter passes
The lighter the pass (i.e. smaller cut width or stepover) the less likely you are to experience tearout and splintering. Using several light passes instead of 1 big heavy pass may be the answer to eliminating these problems.
Tip #8: Cut entry: ramp in and slow down instead of plunging.
Plunge cuts are the most severe way to enter the cut and the most likely to cause tearout. Ramping is gentler and therefore preferred. The exception to the rule is that when using compression and downcut bits, you want to get them down into the cut as fast as possible so they can work their magic.
Tip #9: Route end grain first then long grain
Cut the end grain cuts first and then follow with the long grain. You’ll find this reduces your tearout and splintering.
Tip #10: Shallower cuts
Make shallower cuts. The deeper the cut, the more of the cutter’s helix is in the cut. It is that helical shape that causes the upward pull that leads to tearout and splintering. So, reducing the depth of cut reduces the amount of helix that can apply upward forces.
Tip #11: Put a coat or two of finish (poly, varnish, shellac, paint, etc.) to reduce chipping
We’ve talked about using backing boards to help support the wood so it won’t splinter. Putting a coat of finish also helps support the wood to reduce chipping. You’d be surprised at how well a quick spray can help.
Tip #12: Use masking tape on areas prone to chipping
Same story as the coat of finish. The masking tape will help support the wood against chipping.
Tip #13: Tighter grain wood species–hardwood instead of softwood
Softwood and plywood are just a lot more prone to splintering. Switching to hardwood makes it a lot less likely as the grain is a lot tighter and denser.
Tip #14: use a series of plunge cuts to limit splinter range
A series of plunge cuts along the cut path will limit the range the wood can splinter. Splinters will stop at the end of the plunge.
Tip #15: Use a scoring cut to limit splintering
If you score the surface of the wood, splinters will typically stop at the scored line. Use a sharp knife and a ruler. Put the scored line right at the edge you want to cut. A drag knife might even make it possible to automate the scoring on your CNC.
Tip #16: Straight flute may beat helical on tear out
Remember when I mentioned it is the helix that causes a lot of splintering by pulling up on the wood? Well, try a straight flute cutter. With no helix, at least it isn’t pulling up. It can still pull in a direction parallel to the cut, but you may get around that in other ways.
Conclusion
There you have it. 16 new tools in your arsenal to combat tearout and splintering. Depending on how challenging the materials you cut are, you may never eliminate tearout entirely, but at least you’ve got a fighting chance to control or minimize it.
This post was written by Bob Warfield and originally appeared on the CNC Cookbook blog.