
I love automation – there’s just something about watching a robot making parts you’re going to sell. A machinist friend of mine (Hi Peter T.!) refers to his bank of older CNC lathes as his money printing presses. They sit there with their bar pullers grinding out parts for him to sell all day long and about all he has to do is change bars and inserts from time to time.
Tormach’s line of CNC machines are so inexpensive that we’re hearing of various outfits buying them as platforms for creating dedicated machines of one kind or another.
This is an intriguing proposition, and the Tormach 440s really are incredibly inexpensive platforms for such purposes if you their work envelope is sufficient.
I was recently intrigued by John Saunders' (of NYC CNC fame) video about an automated parts engraver he’s building.
I thought the video gave a good idea of how to go about one of these automation processes. He’s making clamps whose bodies are laser cut, 600 at a time. He needs to engrave a logo onto the clamps after they’re anodized, and he wanted to set up an automated Tormach 440 to do that task.
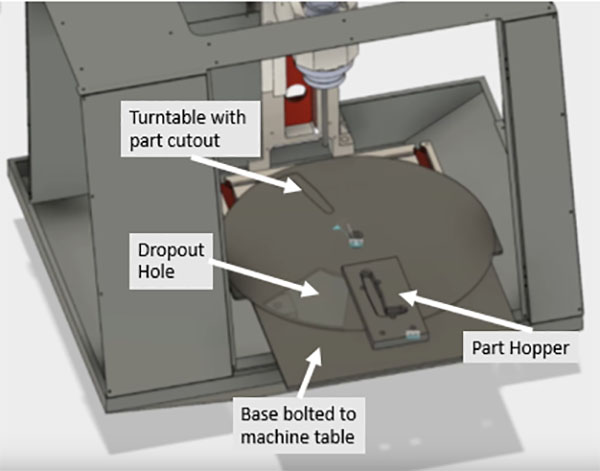
The major part of the project involves creating an automated part feeder that takes a hopper of clamp bodies, presents them to the Tormach’s spindle for engraving, and then drops them through a hole into a hopper.
Here’s a view from his video about what this thing will look like:

The operation is pretty simple. A base made of 1/4″ steel plate is clamped to the t-slot table. Mounted on that base are a turntable with a part cutout and a part hopper. The turntable rotates the part cutout under the hopper allowing one part to drop down. It then rotates to place the part under the spindle for engraving. When the engraving has finished, it rotates until the cutout is over the dropout hole in the base, and the part drops into a finished part hopper below.
Very simple and inexpensive automation, but there are a variety of refinements that could be done:
- Rotation of the turntable improvements. This could be anything from a custom motor to a 4th axis laying on its side and controlled by G-code, to putting a hole in the turntable and letting the spindle catch the hole with a pin to rotate the table. Personally, I like the self-indexing idea, particularly if we can just use the engraving tool and not have to do a tool change to pick up a special pin tool.
- More part cutouts could be added so the indexing distance is less. This would be especially helpful if we want to use the spindle to turn the turntable.
- There’s a possibility that parts will need to be “tapped” out of the cutout to get them to go into the finished part hopper. Lots of ways to do that. I’d try on air blast controlled via solenoid, for example, and it’d be easy to mount that stuff to the base plate.
- There’s a possibility the part needs to be “seated” in its cutout after it drops in place. A ball bearing roller positioned after the part hopper could easily do this.
- There’s a possibility that the part would need to be held down more solidly during engraving. Seems to me it would be easy to add some vacuum grooves under the part on the base and use a solenoid controlled vacuum source to vac clamp the part during the engraving.
I’m sure there are lots of other ways to improve or optimize the design, but the main thing is just to think about how easy an inexpensive CNC platform can make it to do automated second ops like this engraving step.
I’m sure you could think of a number of ways to use a system like this. For example, imagine if you made parts out of small rectangular pieces of stock. Tab the parts into the stock, machine them fully, and drop them into the hopper. On a second op, flip the stack of parts and facemill to release the parts from the tabs. There are tons of possibilities!
This blog originally appeared at CNC Cookbook.