

Often one of the most daunting aspects of machining for beginners and hobbyists is developing cut recipes with the proper speeds and feeds. With a seemingly endless combination of materials, tooling, speeds, feeds, and toolpaths, getting a cut right on the first try can often seem impossible.
We built ProvenCut around the idea of making this process easier by offering an extensive and searchable video library of proven Tormach speeds and feeds examples – but with a little basic knowledge anyone can start developing better recipes on their own.
Let’s start with some basic terminology:
- RPM: This is how many revolutions per minute your tool is spinning – but not how fast the flutes are moving past the part (see Surface Speed).- Feedrate: This is how fast the part is moving relative to the centerline of the tool (essentially the speed at which the machine’s axes are moving).
- Surface Speed: This is the speed the tip of your flutes or cutting edge move with respect to the center of the tool. (For all you physics people, surface speed is your angular velocity while RPM is rotational speed). This is an important concept because a larger tool will cut with a much higher surface speed than a smaller one at the same RPM.
- Feed per Tooth (FPT): FPT controls the thickness (or approximate thickness, we’ll get into this later) of each chip. For example, a FPT of 0.001” means that the tool has moved forward 0.001” each time a flute contacts the part.
- Depth of Cut: Depth of Cut controls the specific cut volume. Radial Depth of Cut / Width of Cut (RDOC or WOC) controls how much of the diameter of the tool is cutting. Axial Depth of Cut (ADOC or just DOC) controls how much of the length of the tool is cutting.
Developing A Recipe:
If you are a beginning machinist, you are probably most familiar with RPM and feedrate – and that’s okay! You can easily become familiar with creating recipes based solely off of these two factors, especially when using the same sized tools in the same material. However – we strongly recommend using feed per tooth and Surface Speed to control your cuts! Why?
1. This tells you exactly how much material your tool is cutting off each time a flute contacts the work, letting you adjust how conservative/aggressive your recipe is easily. You can also be sure a smaller tool is not taking on too much material which is especially important in machines with RPM limitations.2. Many manufacturers give SFM recommendations for a tool, and not RPM.
3. Materials have an optimal SFM range, whereas there is no optimal RPM because cutting conditions change drastically with two different diameter tools at the same RPM.
4. Most importantly, this makes recipes “scalable” – meaning you can move between tools of different sizes and use a similar recipe as a starting point. If your main parameters are surface speed and FPT and your DOC and WOC are set as percentages of your tool’s diameter you can EASILY transfer this recipe to a tool of another size and have a great starting recipe. The places you may run into issues are:
a. Trying to run a small tool at the same surface speed may calculate an RPM that is higher than your machine is capable of. Don’t worry! If FPT is your other driving factor, setting RPM to the machine max will adjust your feedrate and SFM to match and you will get a recipe that your machine is capable of doing – albeit a little slower than if you had the full RPM range.
b. Using the same recipe and jumping to a larger tool may require more horsepower than your machine has and you will need to dial it back. If you’re pushing your machine to its limit, it’s a good idea not to jump to a significantly larger tool and try the same parameters. That being said, this method should always give a good starting point provided it isn’t the most aggressive recipe your machine can run.
What is Chip Thinning?
Earlier we talked about Feed per Tooth, which controls the thickness of the chip and how much material each flute engages. In reality, this number is only technically correct when the tool is cutting at or above 50% of its cutting diameter – which is pretty uncommon. As you can see the image below, each chip is widest at the lagging edge of the flute (entering the cut) and gradually thins until it is cut off at the leading side (as the flute exits the cut).
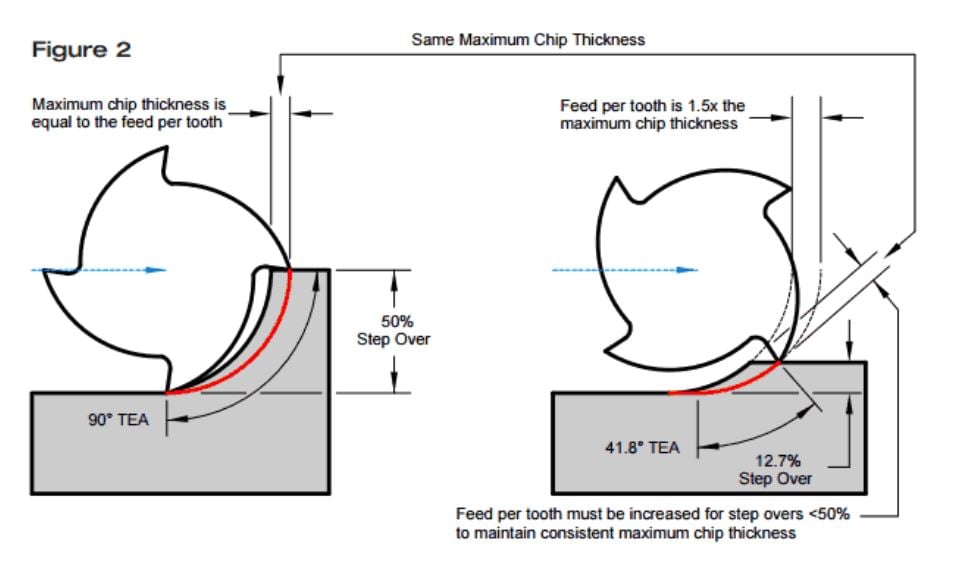
Image courtesy of Harvey Tool
Why does this matter? When you start cutting with less than 50% of the tool’s diameter the actual FPT is less than the programmed FPT. In most applications this is nothing to worry about as we take a large enough radial depth of cut that the tool is not being damaged.
When taking increasingly small cuts with a small FPT and increasingly large tools, issues start popping up. A half inch tool taking a .001” finishing pass at a programmed FPT of .005” results in an actual FPT of only 0.0004” – and before you ask, no, the extra zero isn’t a typo. As you can see, checking the chip thinning FPT with the programmed value can be critical to tool life and preventing rubbing when taking small passes.
Guest Written by John Saunders