
The Rundown on Runout
As covered in our 10 Things No One Tells You About Machining article, runout is everywhere! However with most tools we use this amount is negligible. Using, say, a 3/8” endmill with .0008” of TIR won’t have significant consequences (especially when roughing). Unless you’re chasing tenths, the runout is such a small percentage of the tool’s overall diameter (~0.21%) that it wont have any noticeable affects. As you small diameter tools, this percentage begins to increase. Using a 1/32” endmill with the same runout amounts to a TIR that is 2.56% (about a 10x increase!). This can result in uneven wear, chatter, bad surface finish, missing tolerances, and even broken tools.
Good news: this can be corrected! This can be a bit tricky with most Tormach machines because the tool holder can be put into the spindle in any orientation (key word: most – looking at you 1100MX). We recommend putting a mark on your spindle and tool holders. Aligning these marks each time you put a tool in the R8 collet can help negate runout – or at least give consistent results. Rotating the tool in its holder and the holder in the spindle can negate runout, so experiment with your holders to find the position with the least TIR before you mark them. Our favorite way to adjust runout with small tools is to use a tenths indicator to show the TIR, then lightly tap the shank of the tool with a hammer and screwdriver on its high side. Use electrical tape on the blade of the screw driver to avoid metal-on-metal contact. Recheck and repeat this process until runout is within acceptable values.
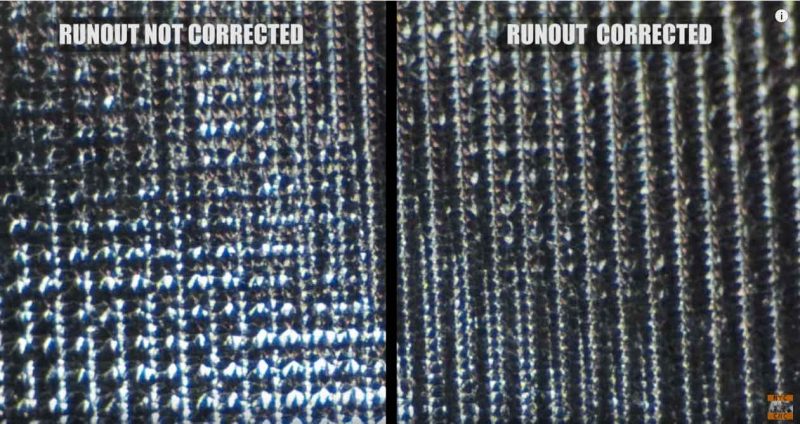
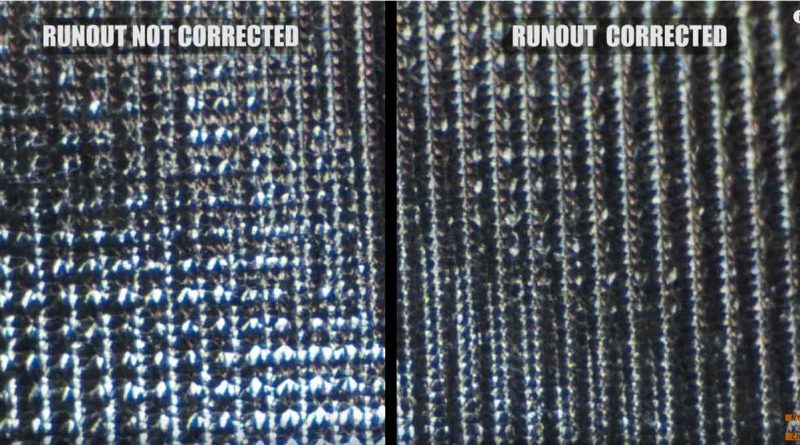
This shows a part surfaced with a 3/64” ball endmill under a microscope– the left side had no corrected runout, and you can see it has significantly more pockmarks than the neat, linear pattern of the right side.
Choosing the Right Tool
As the diameter of your tool decreases, its rigidity decreases even more rapidly. A ¼” endmill is not twice as rigid as a 1/8”! The area of a circle is determined by pi times its radius squared – so as diameter increases by two the amount of carbide is increasing by a power of two and not a factor of two. This being the case, always choose the largest possible tool for the job especially as you move into increasingly small tooling. Many tools smaller than about 1/8” have a larger shank which tapers to the cutting diameter for two reasons: 1) the larger diameter and taper exponentially increases the rigidity as we discussed and 2) a larger shank size such as 1/8” is much more common and reduces the need for specialty holders or collets. When choosing a small tool, maximize rigidity by choosing the largest (reasonable) shank diameter and cutting diameter, shortest flute length, and as little stickout as possible.
How (Not) to Break Tools
With smaller tools, there is much less room for error. Most people are afraid to use a small cutter because they are so much more likely to break – but with the right speeds and feeds, we’ve found you can get machining done first try! The number one pointer we have is to let feed per tooth control your recipe and not feedrate. An important concept to keep in mind here is that even at max RPM your tool’s SFM is much lower with a small tool. Especially on RPM limited machines such as older PCNC1100 mills it is all too easy to cut too fast for such a small tool at relatively low RPM. This is an easy fix! Instead of inputting a certain feedrate into your CAM software, set your RPM to your machine’s maximum or SFM to an appropriate value for the material and then control feedrate by using the feed per tooth as your input. As long as your FPT is reasonable, you won’t find yourself overdoing the feedrate.
How many times have you thrown out or broken an endmill because the chips welded to the tool and filled the flutes when cutting in a gummier material like aluminum? The answer is more than we’d care to admit – and this problem is much more prevalent with smaller tooling. Smaller flutes are much more likely to chip weld and harder to clear, so proper coolant placement and chip evacuation is critical. Flood coolant is ideal in these scenarios, but a properly aligned FogBuster or air blast will get the job done.
Check out ProvenCut for speeds and feeds recommendations to eliminate the guesswork with small tooling!