
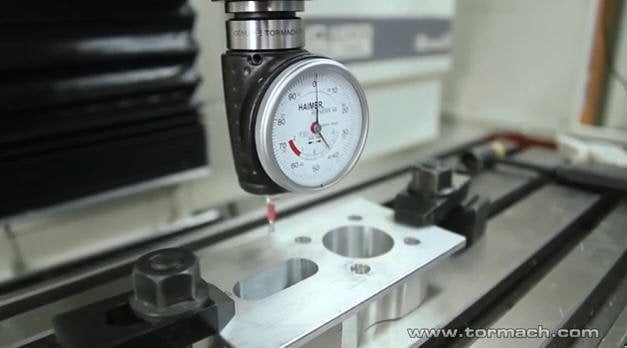
After a bit of time off, we're getting back into the swing of things on the blog. Today's video topic is in response to several recent questions we've fielded recently about a very useful gauge: the Haimer 3D Sensor. For those unfamiliar, Haimer 3D sensors can be used to quickly and accurately find milling work offsets in X, Y and Z. When properly setup, these will exceed the accuracy of most other edge finding techniques available to the small shop machinist. Here are two things to keep in mind:
- Prior to the first use of the Haimer 3D sensor, you'll need to place it in a dedicated tool holder and calibrate the gauge so the tip is in line with the center line of the mill spindle. Once you complete this procedure, the sensor will accurately find XY offsets. As long as you don't remove the sensor from the toolholder or crash/drop the sensor, you should only need to occasionally recheck the gauge calibration (i.e., once per month, once per year - whatever you feel comfortable with as a shop procedure)
- To use the Haimer 3D Sensor to find Z offsets, you simply need to measure the gauge in its tool holder in the same manner as you measure all the tools in your tool table. Just remember to pre-load the tip so that both needles on the dial read "0".
Here's a Fab Lab Skill Builder episode to help you get started with using any one of the Haimer 3D sensors that we carry. In it, Mike C. demonstrates how to calibrate the sensor, and also how to find several common work offsets: edge, center of a square, and hole center. [youtube]http://www.youtube.com/watch?v=nkYpKWbA2P0&list=UUWnQHSxw6cbxYsSQXhBcbQg&feature=share[/youtube] Ready to try one of these on your mill? Click here to Buy Haimer 3D Sensor products from Tormach More Tormach Fab Lab Videos:
- How to Setup a 2-Jaw Chuck on a 4th Axis
- How to Setup a 3-Jaw Chuck on a 4th Axis
- How to Setup a 4-Jaw Chuck on a 4th Axis
- Toolmaker Vises Tips
- How to use a Coaxial Indicator
- Fixture Plate Basics
- Getting Started with Tension/Compression Tapping
- Getting Started with Auto-Reversing Tapping
- How to Swing Indicate a Square
- How to Swing Indicate a Circle
- How to Bore an OD
- How to Bore an ID
- How to Use a Sine Vise
- Tips for using Strap Clamps
- How to Square a Block